Tuesday, March 29, 2016

Coloring Page Ideas

There are different ways you can color your adult coloring pages.  I wanted to show you a few tricks.


Watercolor and marker
Don't be afraid to use watercolors.  You don't have to be experienced using this medium.  Try an inexpensive set of watercolor pencils, a very small brush and small amounts of water on your brush.  You can color with the pencil straight onto the paper, it doesn't take much color at all.  Then using your brush with a small amount of water, begin washing over the pencil strokes.  Once dry, if you'd like more color, just repeat the process.  Or you can dip your brush in water, dab onto a napkin to soak up some of the water then use the brush to run across the tip of your watercolor pencil picking up paint from the pencil tip and paint onto your picture.

One more thing to remember.  The thickness of your paper is important when using watercolors, because of the water.  If your paper is thin, it will curl and warp.  If you are using an inkjet printer to print out your picture, the ink will bleed and smear.

So if you are going to try watercolors to color your adult coloring pages, use a laser printer and print it out on a thicker paper.  No more water than you will be using a 40# paper should be sufficient.


On this piece I learned I could very lightly use a pastel pencil, a small paint brush and a bit of water.  Once the water was absorbed, I could use my watercolors over the top of the pastel for more vibrant colors.


You can also use colored pencils over a watercolor base.  Blending colored pencils is not something I would recommend for a stress free coloring experience.  Using them to blend into the dried watercolor is quite the creative experience though.

Don't be intimidated by all the colored pencil techniques out there.  It's pretty simple.  Here's an example for a stress free coloring experience with colored pencils.

Colored Pencil Tips


Let's color a simple leaf.   Coat the entire leaf in yellow, coloring lightly.


Next take a light green and color over the yellow using a light touch.


Then, add a touch of dark green where you imagine the leaf would be darker.


Lastly, using your yellow pencil once again, blend all the colors together by lightly going over the entire leaf.  If the leaf is too yellow for you, just add more green.


Add an artsy touch by using a black sharpie to give it a bit of personality.  Or you could even use a white marker or both.


You can also use a white colored pencil to blend.  But if you use a color to blend, always blend colors together with a light color as we did with the yellow above.


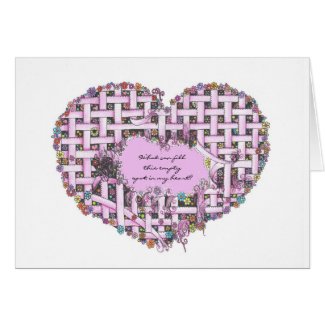
Look at the little spots of white and the small black dots added to this water colored flower.  It just gives it more life and makes it fun.


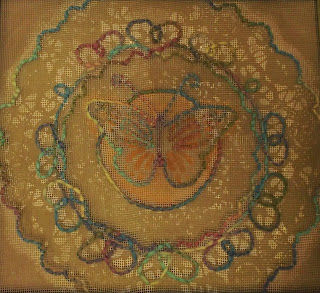
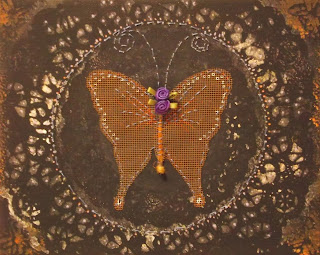
Here is a close up of the butterfly.


Look at this close up of the flowers.


It's your coloring experience, add whatever you like to make it yours.  Try magic markers and then add colored pencil on top of them.  You can use the pastel, watercolor and marker together.  You can use the watercolor and when dried you can use colored pencil on top.  Try markers over the top of colored pencil, it will blend.  Just choose your colors carefully, experiment on scrap paper before you begin on your picture.


If you would be interested in taking a look at all my coloring pages please visit my shop by clicking here, Southern Sky Studio Coloring Pages


Thanks for stopping by and happy coloring.

Tuesday, February 23, 2016

One Drawing In Several Stages Makes Marketing Sense

These days you have to be a bit smarter than I think I am capable of at times.  Eventually I get it, but it takes a while.  You may already know this, but I thought I would share my experience just in case there is someone out there as behind the times in technology as I am.

I discovered that if I stop at strategic spots while drawing that I can actually get more than one illustration to market.

Here's an example.  I started this drawing in pencil, then out lined it in black and continued with the black until I felt I had reached a point that this could actually be a finished black and white drawing.

I scanned the drawing and cleaned it up.  I then took it over to my store on Zazzle and created a product and of course added some words.  So I actually have more than one idea to use here already. I have a poster with my chosen words I placed on the illustration in the Zazzle program and I have a coffee cup with different words that can be customized by the customer.

In the second stage I added just a bit of color and found I had yet another marketable illustration.  So I scanned, cleaned and left it for later to use in much the same way I used the black and white rendering.


Continuing on with the illustration I finished it with several other colors, then scanned, cleaned and begin trying to use my brain to come up with several other ideas.


So from one drawing I had three marketable illustrations that I could place on products in my store to sell.  On top of that I have the original that I can sell after I finish up the center with whatever I decide to do.  I can actually put someone's name in it and give this one away if I like because it is already making money as three distinct illustrations.

But still, I'd just rather be drawing and painting.

And be sure to check out this great site for selling your drawing, it's called Sellfy.  Here's my store, Southern Sky Studio.  Open up your own store for free.

If you are interested you can take a look at some of the products I was able to create.  One product has all three stages of the illustration.  I also took the illustration and added some graphic touches for even more diversity.

This one was my favorite though.


Sunday, January 3, 2016

Coloring Book Inspiration -- The Business of Art

I received some adult coloring books for Christmas.  I wondered if I could do what was suggested to me, that was, relax and just color.

Well, I couldn't do that.  I was inspired somewhat by the idea of drawing my own therapeutic art, so three days later I have...............


Butterflies

And it took a few hours to scan, upload and put the drawing on products in my store.


Hearts and Flowers
I put these drawings on some products that people could color themselves.


Flowers

I just couldn't resist putting a touch of color in it myself.

Needless to say the de-stressing exercise someone thoughtfully gave to me turned into many hours of inspiration.  Although I didn't color a page in any of the books.  I was definitely inspired to draw.

Take a look at the products I was able to put the drawings on that others could actually color for themselves because they are made of cotton or canvas.


Color Me Stuff
Color Me Stuff
by Teresa owner: Southern Sky Studio


And then I thought if I could get inspired just by looking at the drawings in the adult coloring book, then someone else might just feel the therapeutic effects too.  So I put the drawings on other products where they would have to remain just black and white.  If you'd like to see them, click below.


Art Therapy Designs
Art Therapy Designs
by Teresa owner: Southern Sky Studio


Here is a really neat greeting card idea.  Take a look at these below.  You could make some of these yourself to give to a friend.  A gift and card all in one.


Now, if I could just figure out how to make an adult coloring book of my own.  Think I'll work on that next.  Let's face it, you know if you want to make anything of yourself you have to constantly be thinking of ways to do it.  If artists want to make money, making art (before we die) we have to get the work out there. Sometimes the business side of art can eat up more hours in the day than making the actual art.

I just keep telling myself, keep on plugging, keep on drawing, painting, learning and someday it will happen.  Besides I'm enjoying trying.

Please share my posts and my work.  Thanks

Saturday, December 26, 2015

An Artist New Year's Resolution -- Staying Focused

There seems to be a lack of consistency in my work.


Acrylic on barn wood
Acrylic on cardstock with original verse

Colored Pencil


I'll do something serious that takes hours and every stroke can be critical.


Then I'll get some crazy idea to make my own canvas out of paint sticks.  Paint a picture and put a lace stencil around it.

Acrylic on a paint sticks, a frame made of stretcher strips and a doily stencil


Another "bright idea", I'll paint on barn wood!  Sounds like fun?  I turned it into something serious.

Acrylic on barn wood


Well, then I thought I'd try to lighten up on the barn wood and have some real fun.


Acrylic on barn wood


Out of no where I decide to sew on screen wire, whhhhhhhhhhhyyyyyyyyyyyy!

Sewing on screen wire with yarn

After that came the idea of building my own crate with paint sticks.


Crate made with paint sticks


And where ever did this come from?  I decided to do a bit of weaving!  With paint sticks!  Well, I couldn't actually weave them, but believe me I tried.

Woven organizer with paint sticks


Which then gave me the idea of weaving with paper rope..............

Woven wall hanging with paper rope and stretcher strip bar frame

And then I wanted to weave a pot, and so I wove one out of paper and then one out of a t-shirt.

vase woven from an old t-shirt

I painted on lace.............

Lace on stretched canvas


Suddenly I decided that I'd like to paint on canvas again and add something real to the painting, so.....

Acrylic on canvas with real butterflies glued to the canvas


Next, okay, let's do a bit of illustration on pages from the Bible.

Colored pencil and pastel on printout from Exodus


Let's throw in a bit of Christmas crafting, again, whyyyyyyyyyyyy?

Angel made from t-shirt, wood ball and old sheer curtain


Oooh, time to paint again!  But this time, for some reason I decided to play with black and white.....

I went serious.                                                                                                
Pencil on bristol board


Then I played around a bit...........
Pale pink paint sticks
black, gray, white acrylic


This made me think of art therapy, so I had to try my hand at that too!
 
Oh and let's not forget painting and sewing screen wire on canvas.............


And making a pair of flip flops from foam and woven t-shirt scraps.....


I decided to put my art work on products, so I opened up a Zazzle store for my fine art.

Then another for my fun art, with quotes and poetry.  

And then another for greeting cards.  

Then I threw another one in for spiritual things and of course I had to have a store for the children's art I love to do. 

 Here's one of those............

Acrylic and water color pencil on bristol board


Oh and lest I forget, I also have a store for the kitchen.  I love designing the kitchen products with my art too!

So here is my artsy resolution, ready, here goes..............

This year, 2016, I'm going to try to be more focused, try to stick to one or two things and work on perfecting those areas.  I think I can, I think I can, I think I can!

Wish me luck.

Friday, November 27, 2015

Wheat - Attention to Detail


This painting was quite a challenge for me.  Well, I was trying to challenge myself not to rush through it and think it through a bit more than I usually do.  But, I did get stuck at moments.

It began with the sky.  Whenever I am unsure of myself, I can always start with the sky, it is a motivator for me and one part of my paintings that I have a bit of confidence in.


As I was working on the sky, it helped me to decide what I'd like to do next.  I wanted a silo, wheat field and a barn too. So I began researching silos, wheat and barns.  When I decided on what I liked and where I would put them on the canvas, instead of just starting to paint them in, I actually, quickly sketched the barn and silo with pencil, which is not something I normally do.  I was on to painting shortly after the research finished, because with acrylic paint, the sky and horizon were already dry.  Acrylic dries fast.


I went ahead and painted in the base color of my land where the wheat would be and played with the sky some more.  I knew I needed to make everything on the left side of the barn darker and place my shadows just so because the sun was actually coming from the right side.  I worked on this through out each step of the painting.


To make the wheat in the foreground stand out more I had to darken the shadows and field even more.  Knowing I wanted the sun to be hitting my most forward wheat, I began placing it in here and there with white paint.


I got stuck for awhile on my wheat.  I kept going lighter and lighter and it continued to blend in with my sky until I was pretty frustrated.  It wasn't until I bit the bullet and went darker on the wheat did I fix the problem.  Then I was able to highlight the wheat to make it look as if the sun was hitting it.


But, oh that barn, I couldn't figure out what was wrong.  It looked too perfect and that's when I began working on the roof, giving it some age.  


I gave it a road, added more wheat and still wasn't happy.  It was the barn, I knew it was, but just couldn't think of what exactly it was about the barn.


Though adding those elements helped, it wasn't until I actually aged the wood that it came to life.  Put some holes and places where the wood had chipped away and was finally was able to move on.


A bit of light coming from the hole in the roof down into the inside of the barn, darken up the sky a bit more on the left.  Bring a few clouds on the horizon on the right.  Fix the silo shading.  And I think I've got a finished painting.


Growing up, scenes like this weren't something I noticed everyday, in fact not very often at all.  But there is something so inviting and breathtaking about the countryside, I would be happy living in a barn with this as my yard.  Wish I would have paid more attention to details like this while growing up.

I hope you enjoy my wheat field, barn and silo.  I really loved painting this scene and learned quite a bit from the experience.


This is an acrylic painting on stretched canvas.   If you would like a print of this particular work, please visit my store by clicking below to view the posters.